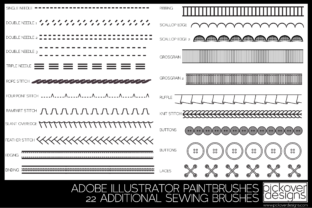
Mastering Digital Fashion: A Guide to the 22 Additional Sewing Brushes
Digital fashion illustration has evolved from a niche skill into a cornerstone of the modern design industry. Whether you are drafting your first mood board or finalizing a technical pack for a major retailer, the tools you use define the clarity and appeal of your work. This is where the 22 Additional Sewing Brushes collection becomes an invaluable asset. Designed specifically for digital artists, this set offers 22 simple and easy-to-use sewing stitches tailored for fashion illustrations. Unlike standard drawing tools that often look too rigid or artificial, these brushes mimic the organic texture of real thread, allowing both seasoned designers and beginners to find the right stitch for any fabric type.
The true power of this collection lies in its adaptability. Each brush is engineered to change tints seamlessly with any color you choose, ensuring your stitching matches your fabric swatches perfectly. Furthermore, the size of the brush can be easily changed, giving you granular control over everything from delicate silk hems to heavy-duty denim seams. However, possessing high-quality tools is only half the battle. Many creators, eager to elevate their portfolios, stumble not because of the software they use, but because of how they apply these specific resources. Understanding the nuances of digital stitching can prevent common pitfalls that undermine the professionalism of your illustrations.
Overlooking the Importance of Stitch Selection
One of the most frequent missteps designers make is treating all stitches as interchangeable. In physical garment construction, a running stitch serves a vastly different purpose than a blanket stitch or a zigzag. The same logic applies to digital rendering. A common error involves using a decorative stitch where a structural one is needed, or vice versa. For instance, applying a thick, visible topstitch to a sheer chiffon blouse in an illustration can confuse the viewer about the garment's weight and drape. It suggests a heaviness that contradicts the fabric's nature.
To avoid this, take a moment to evaluate the fabric you are illustrating before selecting a brush from the 22 Additional Sewing Brushes set. If you are drawing denim, look for the heavier, more pronounced stitches in the collection. For lightweight knits, opt for the finer, subtler lines. This attention to detail communicates your understanding of textile properties to potential clients or employers. It transforms a flat drawing into a believable representation of a wearable item. Remember, the goal of a fashion illustration is not just to show what the clothes look like, but to convey how they feel and function.
Mismanaging Color and Opacity
While the ability for each brush to change tints is a standout feature, it also invites a specific type of user error: relying solely on pure black or default colors. Beginners often leave the stitch color as black, assuming it provides the best contrast. In reality, sewing thread rarely appears pitch black on colored fabrics; it usually picks up environmental light or is chosen to blend in or contrast intentionally. Using stark black stitches on a pastel pink dress can make the illustration look amateurish and disconnected.
A better approach is to sample colors directly from your fabric layers. If your jacket is navy blue, try sampling a slightly lighter or darker shade of that same blue for the stitching. This creates depth and realism. Additionally, do not ignore opacity settings. Real thread has texture and reflects light. By slightly lowering the opacity of your brush stroke or using a "multiply" blend mode, you can simulate the way thread sits on top of the fabric rather than looking like it was painted underneath. This small adjustment significantly enhances the three-dimensional quality of your work.
Neglecting Scale and Proportion
The feature that allows the size of the brush to be easily changed is powerful, yet it is often misused through inconsistency. A frequent issue in digital portfolios is seeing massive, chunky stitches on a miniature accessory sketch, or microscopic, barely visible threads on a full-body coat illustration. This disconnect in scale breaks the viewer's immersion. It suggests a lack of spatial awareness and can make the technical aspects of the design unclear.
Before you begin stitching, establish a baseline scale for your canvas. If you are working on a standard fashion croquis, determine what a realistic millimeter measurement looks like in pixels. Test a few strokes from the 22 Additional Sewing Brushes at different sizes to see which one mimics a real-world 3mm or 5mm stitch length. Once you find that sweet spot, stick to it throughout the piece unless you are deliberately highlighting a specific detail like a reinforced pocket. Consistency in scale assures the viewer that you understand garment construction ratios.
Ignoring the Context of the Illustration
Another overlooked detail is the context in which the stitches are applied. Some designers go overboard, adding stitching to every single seam line visible in the drawing. While technically accurate, this can clutter the image and distract from the silhouette and flow of the garment. Fashion illustration is an art form that balances technical accuracy with aesthetic appeal. Over-rendering can make a design look busy and overwhelming.
Adopt a strategic mindset. Ask yourself: Which seams are critical to the design story? If you are showcasing a deconstructed jacket with exposed seams, then yes, highlight those stitches prominently using the textured brushes. If you are illustrating a sleek, minimalist evening gown, the stitching should be subtle, perhaps only visible at the hem or neckline to suggest finish quality without dominating the visual field. Use the variety within the 22-stitch collection to differentiate between functional seams and decorative details. This selective application demonstrates a mature design eye.
Failing to Organize Your Workflow
Efficiency is key for freelancers and small business owners who need to turn around concepts quickly. A common productivity killer is disorganization. Downloading the brush set is the first step, but failing to organize them within your software can lead to wasted time searching for the right tool mid-flow. Some users dump all 22 brushes into a generic folder, making it difficult to recall which brush creates a serged edge versus a blind hem.
Take the time to set up your workspace effectively. Create custom groups or folders within your brush panel labeled by function, such as "Structural," "Decorative," and "Finishing." You might even rename the brushes based on their best use case (e.g., "Denim Topstitch" or "Silk Hem"). This preparation pays off when you are under a deadline. It allows you to switch tools instinctively, keeping your creative momentum intact. Moreover, keeping your layers organized—placing stitches on a separate layer above the fabric but below any highlights—ensures you can edit or remove stitching later without ruining the underlying color work.
Making the Right Choice for Your Needs
Ultimately, the value of the 22 Additional Sewing Brushes comes from how well they integrate into your specific workflow. Before committing to using them for a client project, run a quick test. Create a small swatch sheet where you apply each of the 22 stitches to different colored backgrounds. Observe how the tint changes and how the texture interacts with various shades. This practice run will reveal which brushes are your workhorses and which are specialized tools for rare occasions.
Whether you are an educator teaching the next generation of designers, a marketer creating visuals for a clothing brand, or a hobbyist documenting your sewing projects, these tools offer a bridge between traditional craftsmanship and digital efficiency. By avoiding the traps of poor scale, incorrect color choices, and indiscriminate application, you ensure that your illustrations stand out for their professionalism and clarity. The right stitch, applied with intention and knowledge, tells a story of quality and care that resonates with anyone viewing your work.